Turbo Rebuild
Terminology
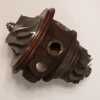
- Turbine (Wheel)
- The bladed wheel that exhaust gasses flow past, imparting rotation on the compressor wheel. Attached to the shaft.
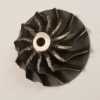
- Compressor (Wheel)
- The bladed wheel that intake air flows past, either drawn by engine vacuum or forced by the rotation of the compressor.
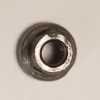
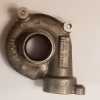
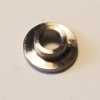
- Housing / Cover
- The static cast (in stock form) pieces of metal that direct intake/exhaust gases around their respective wheels. The compressor housing on stock turbochargers is silver and the turbine housing is dull gray.
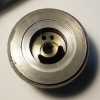
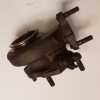
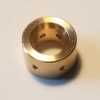
- CHRA (Centre Housing Rotating Assembly)
- Essentially the entire turbocharger without the compressor and turbine housings.
Parts

Things to Avoid
- Avoid damage to the wheels at all costs, especially if you don't plan to rebalance them. Never bear any weight on the fins of the wheels while the CHRA is assembled.
- Avoid introducing contaminates to the insides of the turbochargers, they are exposed to your oil system and can cause engine damage if contamination escapes.
Removing Your Turbochargers
I'll add information here later, but for now I'll assume your turbos are out of the car.
This section is a stub, it will be expanded in future updates.
Preparations for Rebuild
Necessary Tools
- Very Large Internal Snap Ring / C Ring Pliers
- Normal Internal Snap Ring / C Ring Pliers
- Two Normal Flat Blade Screwdrivers
- Tiny Flat Blade Screwdriver, Pin Punch, or Pick
- Needle Nose Pliers, or Hook Pick
- Socket Set
- Silicone Spray
- Degreaser of Choice
Necessary Consumables
- Two TD04 Rebuild Kits
- One or Two 9B Compressor Wheels (If Damaged)
- One or Two TD04 Turbine Wheels (If Damaged)
Prepare a desk space of about 3 feet by 6 feet or more. Various components are heavy/sharp/oiled so if you're using your kitchen table like I am and co-habitate, I suggest laying down some layers of bubble wrap with an old sheet overtop.
Once an area is established, set aside everything for one turbocharger. You don't want to accidentally install the old parts from one into the other, and having a complete unit for reference when reassembling is never a bad thing.
Rebuilding Your Turbochargers
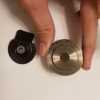
Removing Your Turbine & Compressor Housings
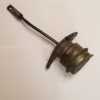
Firstly, remove the wastegate actuator if you haven't already. It is held to the compressor housing by two bolts, and to the exhaust gas bypass lever by a small hairpin.
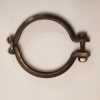
Remove the turbine housing by loosening the clamp surrounding its seal to the CHRA. It is pressed onto a guide pin, so once the clamp is loose or removed, it may still need some encouragement to separate from the CHRA. Rock back and forth or pry gently.
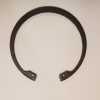
With the turbine housing out of the way, you now have access to the snap ring retaining the compressor housing. You may need to spin the snap ring with a screw driver so that you have access to the pin holes past the CHRA. Using the large snap ring pliers, remove the snap ring. It will take a lot of force to compress, and will spring back hard if you slip. If you remove it half way and try to pop the rest out with a screwdriver, it is liable to catapult across the room and through a window.
Removing the Wheels & Shaft
If you are not planning to rebalance your turbo (you definitely should), take the opportunity to mark the relative positions of both wheels in relation to the housing, shaft and nut. This will help minimize changes in balance that can occur during the rebuild process. I would advise using a fine tipped paint pen that can be removed once reassembled.
Holding the end of the shaft nearest the turbine wheel, break the torque on the nut near the compressor wheel. The stock nuts on our turbos are NOT reverse threaded. Be careful to apply only rotational torque and not lateral, as it is possible to warp the shaft. Keep track of the nut. Most rebuild kits come with reverse threaded nuts so we will be reusing ours.
Slide the compressor wheel off of the shaft and set it back down on your work surface.
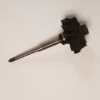
Pull the shaft out of the CHRA from the turbine side. It may need some encouragement, a spring clip retains the turbine wheel (but in worn turbos it often loses its elasticity). If you apply pressure to the shaft be extremely careful not to warp it. The turbine wheel, shaft, debris guard and potentially the turbine journal bearing will all come out together.
Rebuilding the Shaft
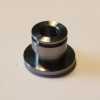
Slide the debris shield off the shaft.
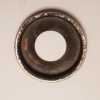
Remove the turbine journal bearing from either the shaft or the CHRA (depending on if the shaft dislodged it). You may need to clean some buildup from the shaft in order for it to slide off. Set it in a designated area for spent parts.
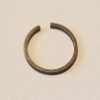
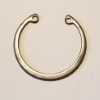
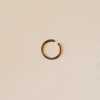
Close to the turbine wheel, there is a small clip that helps retain and seal the turbine wheel. It is likely to be extremely brittle and will probably snap into seveal pieces during removal. Remove this snap ring.
The shaft and turbine wheel should now be a single static piece. It's time to clean it, as well as the debris shield. Soak it in your favourite degreaser, use an ultrasonic cleaner, or just some grease fighting dish soap and a cloth. Be extremely careful not to damage the turbine wheel.
Once dry, install the new clip near the turbine wheel, slide a new journal bearing into place on the shaft and return the dust shield to its place.
Rebuilding What's Left of the CHRA
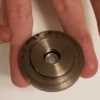
Using normal sized snap ring pliers, remove the smaller snap ring on the compressor side of the CHRA.
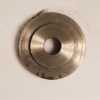
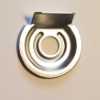
Using two screwdrivers, evenly pry up on the lip of the raised inner circle of the CHRA, on the compressor side. With the snap ring out of the way, the center section should come up, revealing a moon-shaped thrust bearing.
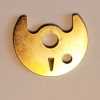
On the plate you just removed, there should be four distinct parts: the plate itself, a thin metal bracket with a tab, a standoff and a clip therein. Your rebuild kit should have the latter three parts. Remove them from the former by pushing on the outer side of the standoff with your thumb. Assemble the replacement parts matching the ones you just removed, and seat them into the plate after cleaning it. Set this assembly aside to reinstall later.

Grab your new thrust bearing and note the different sides. Observe which side is facing up in the CHRA, and gently place the thrust bearing on top of your plate assembly in the correct orientation. Remove the old one and set it with your spent parts, including the small thrust washer seated in the center hole. Place your new thrust washer in the new thrust bearing on your staged parts pile.
With the thrust bearing out of the way, you should have access to the compressor journal bearing, identical to the one you replaced on the shaft. Remove it, and place its replacement on the new thrust bearing on your staged parts.
Next up are the two clips that prevent the journal bearings from falling inward, out of place. There is one accessible on each side, behind where the respective journal bearings are. If you're very careful with an appropriate sized pin punch or flat blade screw driver, you should be able to pop them out of their channel with a small impact. Once free, they can be retrieved with needle nose pliers or a hook pick. Be careful not to gouge the outer races where the journal bearings sit.
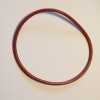
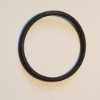
Finally, there are two O rings to replace. One inside the compressor side of the assembly where the plate was, and one outside of the CHRA where the compressor housing mounts. Remove the old ones.
At this point your CHRA can be properly cleaned as all the moving parts have been removed. Follow a similar process to the shaft and debris shield but do not introduce any debris including cloth fibers to oil-filled areas.
Once cleaned and dry, install the new interior journal bearing clips. Installing should be much easier than removing. Simply work them down the journal race with a pick, screwdriver or pin punch, alternating sides until they spring into their channel.
Once the journal bearing clips are installed, it's a rather simple reassembly process. Install:
- The Interior O Ring
- The Compressor Journal Bearing
- The Thrust Bearing (Using The Roll Pin)
- The Plate Assembly (Use Silicone Spray to Avoid Tearing the O Ring)
- The Small Snap Ring
- The Shaft Assembly (You'll Need to Tap the Shaft to Pop the Fresh Clip Into Place)
- The Compressor Wheel
- The Nut (Finger Tight)
At this point your CHRA should be fully assembled, sans torque on the nut. If you spin the turbine, the compressor should also spin. Most of any shaft play that was present should be gone. Torque the nut to 100 inch pounds, taking the same precautions as during disassembly.
Balancing Your Turbochargers
At this point you should have your CHRA's balanced. If you're careful with your marking and reassemble exactly as things were taken apart, in most cases you will be fine. But it is always best to have them balanced properly. Ensure you are done inside the turbo before having them balanced.
Any diesel or turbo specialty shop should have the equipment, and if you bring them the CHRA's, it should be between $20-$50 per CHRA.
During the balance process oil should be pressurized through the turbo, this will prime your new bearings for reinstall as well.
They will give the CHRA's back to you assembled. From this point on, do not take the nut back off unless you want to balance them again.
Final Steps
The remainder should be self explanatory. Put the compressor housing back on in line with the centering pin and reinstall the snap ring. Reinstall the turbine housing similarly and lock down the clamp. You should now be ready to reinstall.